Yes, you can dermaplane at home, but what you’re actually doing is closer to careful facial shaving than to professional dermaplaning. The two procedures share a name and a tool that looks similar, but they work differently and produce different results. At-home dermaplaning removes peach fuzz and the very top layer of dead skin cells, which gives you smoother makeup application and a brighter look for a few days. Professional dermaplaning uses a sterile surgical blade in trained hands to safely remove a deeper layer of dead skin, often combined with a chemical peel or hydrating treatment, and gives you more dramatic results that last longer. Both are legitimate, both are useful, and the right choice depends on your skin and what you’re trying to achieve. After more than a decade of working with Alaska skin in Fairbanks, Anchorage, and Wasilla, the team at Faces By Amie gets this question every week, and the honest answer doesn’t fit either of the extremes you’ll find online.
Here’s the full breakdown from a Master Injector and RN. What you can safely do at home, how often, with which tools, and the specific moments where professional dermaplaning is worth booking instead.
The Truth About At-Home vs Professional Dermaplaning
Most articles online either tell you “anyone can do this safely at home” or “never attempt this without a professional.” Both are wrong. The real answer depends on understanding what each procedure actually is.
At-home dermaplaning uses a small angled razor called a shavette or a battery-powered device with an oscillating blade. It removes vellus hair (peach fuzz) and the very surface layer of dead skin cells. It’s safe for most skin types when done correctly, and the results are mild. Smoother makeup application, slightly brighter skin for a few days, and softer texture. That’s the realistic outcome.
Professional dermaplaning uses a sterile surgical blade called a #10R, held by a trained provider, at a precise 45-degree angle. It removes vellus hair and a measurable depth of the stratum corneum (the outermost layer of skin). It’s often paired with a chemical exfoliant, a hydrating mask, or LED therapy. The results are noticeably deeper. More glow, better skincare product absorption for the next two weeks, and a visible smoothing that lasts three to four weeks.
Neither is better universally. They’re different services with different outcomes, and treating them as the same procedure is what causes confusion. Once you understand the distinction, the rest of your decisions get easier.
Can You Safely Dermaplane at Home?
For most people with healthy skin, yes. The procedure is essentially a controlled face shave with a tool designed for facial use. It’s been around for decades and the technique is well-established.
The people who should not dermaplane at home include anyone with active acne (breakouts get worse, not better), anyone with eczema, rosacea, or psoriasis (the surface disruption can trigger flares), anyone currently using prescription retinoids or strong AHA/BHA exfoliants (the skin is already shedding faster than usual and additional exfoliation causes irritation), anyone with active cold sores or open lesions on the face, anyone with a recent sunburn or chemical peel within the last two weeks, and anyone with a skin condition diagnosed by a dermatologist that hasn’t been cleared for at-home exfoliation.
If none of those apply to you, at-home dermaplaning is generally safe with the right tool, the right technique, and the right frequency. We’ll cover all three.
Choosing the Right Tool: A Tier Guide
The single most common mistake we see is people using the wrong tool. Here’s what’s actually safe and what’s not.
The tier that works (under $15). Single-use facial shavettes or dermaplaning razors sold at Sephora, Ulta, Amazon, and most beauty supply stores. Brands like Tinkle, Schick Silk Touch-Up, and Stacked Skincare are reliable choices. These have a covered guard on the blade, are designed for facial use, and are meant to be replaced every 2 to 3 uses. Think of them as disposable tools, not investments.
The premium tier ($80 to $200). Battery-powered devices like PMD Personal Microderm Pro or similar oscillating tools. These can be effective but require more practice and have a steeper learning curve. They also have a bigger margin for error if you press too hard or move too fast.
The tier to avoid. Cheap “facial razors” from the mall or non-beauty retailers, especially those without a safety guard. These nick easily, can cause uneven cuts, and are often manufactured for general use rather than facial skin. Same goes for using men’s razors or eyebrow blades on the face. The injury risk is real and not worth the savings.
Whatever tier you choose, the tool needs to be clean, sharp, and not reused beyond its recommended uses. Dull blades cause more skin damage than sharp ones because you press harder to get the same effect.
Step-by-Step: How to Dermaplane Your Face at Home
Here’s the actual technique. Take it slow the first few times.
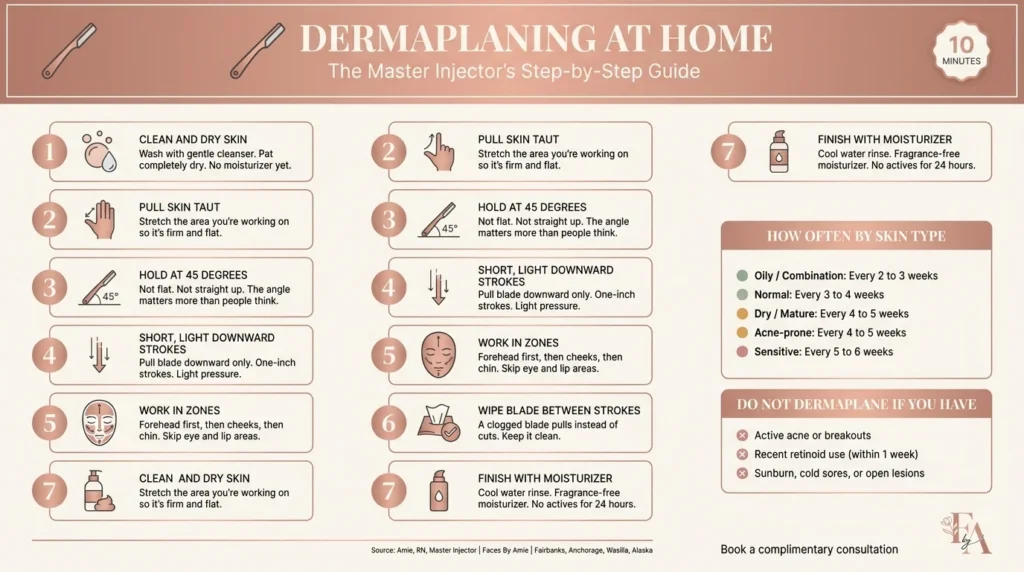
Start with clean, dry skin. Wash your face with a gentle cleanser and pat completely dry. Damp or wet skin grips the blade differently and increases nick risk. No moisturizer or oil yet.
Pull the skin taut with one hand. Stretch the area you’re working on so the surface is firm and flat. Loose skin folds under the blade and causes uneven results.
Hold the blade at a 45-degree angle. Not flat against the skin and not straight up. The angle matters more than people realize. Practice the angle on the back of your hand first if you’re new.
Use short, light, downward strokes. Always pull the blade downward in the direction of hair growth, never upward. Each stroke should be about an inch long. Don’t drag the blade across large sections in one motion.
Work in zones. Start with the forehead, then move to one cheek, then the other cheek, then the chin, then around the mouth. Skip the area directly around the eyes, the lips, and any active blemishes.
Wipe the blade between strokes. Use a clean tissue to remove the skin and hair buildup. A clogged blade pulls instead of cuts.
Stop the moment you feel resistance or discomfort. If the blade catches, snags, or stings, you’re pressing too hard or working at the wrong angle. Adjust and try again with lighter pressure.
Finish with cool water and a gentle moisturizer. Rinse the face, pat dry (don’t rub), and apply a fragrance-free hydrating moisturizer. Skip active ingredients for the next 24 hours. No retinoids, no acids, no scrubs.
The whole process should take 10 to 15 minutes once you’re used to it. Rushing leads to mistakes.
How Often Should You Dermaplane at Home?
This is where most articles give blanket advice that doesn’t actually fit anyone. Here’s the breakdown by skin type.
Normal skin: Every 3 to 4 weeks. This matches your natural skin cell turnover cycle, which is roughly 28 to 30 days.
Oily or combination skin: Every 2 to 3 weeks. Faster cell turnover means more dead skin to manage, and oily skin tolerates more frequent exfoliation.
Dry or mature skin: Every 4 to 5 weeks. Slower turnover and a more fragile barrier means less frequent exfoliation works better.
Sensitive skin: Every 5 to 6 weeks, if at all. Sensitive skin is the most likely to react to over-exfoliation. Start with longer gaps and shorter strokes.
Acne-prone skin (without active breakouts): Every 4 to 5 weeks. Be cautious. If a breakout starts, stop until it clears.
The most common mistake we see is people dermaplaning weekly because they like the immediate smooth feeling. This over-exfoliates the skin, damages the barrier, and ironically makes skin look duller over time. More is not better.
The Critical 48 Hours After
What you do for the next two days after dermaplaning determines whether your skin looks great or breaks out.
Sun protection is non-negotiable. Freshly exfoliated skin is more vulnerable to UV damage. Apply SPF 30 or higher every morning for at least the next week, even in Alaska winter when it feels like the sun barely exists. Snow glare and reflected UV are real, and a fresh exfoliation makes you more susceptible.
No active skincare ingredients for 24 to 48 hours. Hold off on retinoids, glycolic acid, salicylic acid, vitamin C, and any chemical exfoliant. Your skin already got its exfoliation. Adding more is what causes the post-dermaplaning breakouts people complain about.
Hydrate aggressively. Use a hyaluronic acid serum or a ceramide-rich moisturizer for the next two days. Freshly exfoliated skin absorbs hydrators dramatically better than usual, so this is actually the best time to use them.
Skip heavy makeup for 24 hours if possible. Let the skin breathe. If you must wear makeup, use clean brushes and stick to mineral-based products.
No hot showers, saunas, or intense workouts for 12 hours. Heat and sweat on freshly exfoliated skin can cause inflammation and breakouts.
Don’t pick or touch. Sounds obvious. Still worth saying.
When You Should Skip At-Home Dermaplaning Entirely
A few specific situations where putting the blade down is the right call.
If you’ve used a prescription retinoid (Retin-A, tretinoin, tazarotene, adapalene) in the last week. Your skin barrier is already disrupted and additional exfoliation will cause irritation.
If you have an active acne breakout in the area you want to dermaplane. The blade can spread bacteria and inflame the surrounding tissue.
If you have a cold sore, sunburn, or any open lesion on the face. Period.
If you’ve had a chemical peel, laser treatment, or microneedling in the last two weeks. Let the skin heal first.
If you’re pregnant. Most professionals consider it safe, but skin changes during pregnancy can be unpredictable and irritation risk is higher. Wait until after delivery or talk to your provider.
If you’ve never dermaplaned before and you have a major event in the next 48 hours. First-time reactions can include redness, sensitivity, or unexpected breakouts. Don’t experiment on a deadline.
When Professional Dermaplaning Is Worth the Booking
At-home dermaplaning is perfect for ongoing maintenance, smooth makeup application, and brightening up between professional treatments. But there are specific moments when professional dermaplaning is the better call.
Before a major event. Weddings, photo shoots, anniversaries, milestone birthdays. Professional dermaplaning gives you a deeper glow that lasts longer and photographs better than what you can achieve at home. Book it 2 to 5 days before the event so any minor redness has time to settle.
Seasonal skin renewal. In Fairbanks and across Alaska, the end of winter is brutal on skin. Months of dry indoor air, layered scarves, and minimal sunlight leave skin dull and uneven. A professional dermaplaning treatment in March or April resets the skin for spring. The same applies in early fall when summer sun damage needs addressing.
When your skincare products stop absorbing well. If your serums and moisturizers are sitting on top of the skin instead of sinking in, you’ve got dead skin buildup that home dermaplaning can’t fully clear. A professional treatment removes the deeper layer and restores product penetration for weeks.
Combination treatments. Dermaplaning paired with a chemical peel, hydrating facial, or LED therapy produces results that aren’t possible at home with a single tool.
Pigmentation and texture concerns. Sun damage, melasma, fine lines, and uneven texture respond better to professional treatment, sometimes as part of a series.
You’re not getting the results you want at home. This is the most common reason patients book with us. They’ve been dermaplaning at home for months, the immediate smoothness fades fast, and they realize the technique only does so much. Professional dermaplaning is the next level.
A Note for Alaska Skin
Skin in Fairbanks, Anchorage, Wasilla, and the rest of Alaska faces unique challenges that affect dermaplaning decisions.
Winter air is dry, both outside and indoors with constant heating. Your skin barrier is already working overtime. Reduce dermaplaning frequency in deep winter and double down on hydration after each session.
Summer brings long sun exposure and snow glare even at high latitudes. SPF is more important here than people realize, especially after exfoliation.
Indoor heating from October through April pulls moisture from skin constantly. A humidifier in your bedroom plus consistent moisturizer use makes a bigger difference than people expect.
If you spend time on the North Slope, in the bush, or in oilfield work, the wind, cold, and lack of skincare consistency on remote rotations can leave skin in rough shape. Professional dermaplaning before and after long rotations is something we recommend to several patients in those industries.
Frequently Asked Questions
Will dermaplaning make my facial hair grow back thicker or darker?
No. This is one of the most persistent myths in skincare. Vellus hair (peach fuzz) is genetically programmed to grow back at the same color, texture, and thickness. Cutting it with a blade does not change the follicle. The hair may feel slightly stubbly for a day or two because the cut end is blunt rather than tapered, but it returns to normal within a week.
How long do the results from at-home dermaplaning last?
Most people see noticeable smoothness for 5 to 7 days. The brightening effect tends to fade within 3 to 5 days. The makeup application benefit lasts about a week. After that, dead skin builds back up and you’ll see the routine effects diminish until your next session.
Why does my skin break out after dermaplaning?
Usually one of three reasons. Dirty tool transferring bacteria. Too aggressive or too frequent exfoliation overwhelming the skin barrier. Or post-dermaplaning skincare that’s too active (retinoids, acids, vitamin C right after). Use clean tools, space your sessions properly, and keep the 48 hours after dermaplaning simple and hydrating.
Can I dermaplane my face if I’m using retinol?
Not on the same day or even the same week as a dermaplaning session. Retinol increases cell turnover and thins the surface layer. Adding exfoliation on top causes irritation, peeling, and barrier damage. Pause retinol for 3 to 5 days before dermaplaning and wait at least 48 hours after before resuming.
How do I know if I should book a professional treatment instead of doing it at home?
A few signs. You’ve been dermaplaning at home consistently and the results aren’t lasting. You have a specific event coming up. You have pigmentation, texture, or skin barrier concerns. You’re not sure your technique is right. Or you simply want to experience the difference. A complimentary consultation lets you ask all the questions before committing to anything.